Introduction to Mill for Scala

Mill is a fast JVM build tool that supports Scala, speeding up common development workflows by 5-10x compared to Maven or SBT. Mill aims to make your JVM project’s build process performant, maintainable, and flexible even as it grows from a small project to a large codebase or monorepo with hundreds of modules:
-
Performance: Mill’s build graph automatically caches and parallelizes build tasks, minimizing the amount of work that needs to be done and keeping your workflows fast and responsive.
-
Maintainability: Mill build tasks are self contained without side-effects making it easy to trace the data-flow, and its IDE support (via IntelliJ or VSCode) lets you "jump-to-definition" around your build as easily as any application codebase.
-
Flexibility: Mill custom logic is written in custom build logic in type-checked code, rather than error-prone shell scripts, verbose AntRun XML, or complicated external plugins. Mill’s custom tasks and modules allow anything from adding simple pipelines, up to adding entire language toolchains, meaning it can be easily customized to fit exactly what you need.
Mill is used to build many mainstream Scala projects, such as the Coursier dependency resolver, Scala-CLI, and the Ammonite REPL
Mill borrows ideas from other tools like Maven, Gradle, Bazel, or SBT. It tries to learn from the strengths of each tool, while improving on their weaknesses.
Compared to SBT:
-
Mill makes customizing the build yourself much easier: most of what build tools do work with files and call subprocesses, and Mill makes doing that yourself easy. This means you can always make your Mill build do exactly what you want, and are not beholden to third-party plugins that may not exist, be well maintained, or interact well with each other.
-
Mill is much more performant: SBT has enough overhead that even a dozen subprojects is enough to slow it down, while Mill can handle hundreds of modules without issue. Custom tasks in SBT re-execute every time, whereas in Mill they are cached automatically. Mill’s watch-for-changes-and-re-run implementation has much lower latency than SBT’s. The list of ways Mill improves upon SBT’s performance is long, and at the command line you can really feel it
-
Mill builds are much easier to understand: Your Mill build is made of bog-standard
objects anddefs, rather than SBT’s four-dimensional task matrix. Your IDE’s "jump-to-definition" in Mill actually brings you to the implementation of a task, rather than an SBTtaskKeydeclaration. Customizing things is as simple as writing or overriding `def`s. The net effect is that despite both tools' build files being written in Scala, Mill’s build files are much easier to understand and maintain.
For a more detailed dive into the problems with SBT or how Mill improves upon them, check out the following blog posts:
If you’re interested in the fundamental ideas behind Mill, rather than the user-facing benefits discussed above, the following presentation and companion blog post is a good introduction into what the Mill build tool is all about:
The rest of this page contains a quick introduction to getting start with using Mill to build a simple Scala program. The other pages of this doc-site go into more depth, with more examples of how to use Mill and more details of how the Mill build tool works.
If you are using Mill, you will find the following book by the Author useful in using Mill and its supporting libraries to the fullest:
Simple Scala Module
import mill._, scalalib._

object foo extends RootModule with ScalaModule {
  def scalaVersion = "2.13.11"
  def ivyDeps = Agg(
    ivy"com.lihaoyi::scalatags:0.12.0",
    ivy"com.lihaoyi::mainargs:0.6.2"
  )

  object test extends ScalaTests {
    def ivyDeps = Agg(ivy"com.lihaoyi::utest:0.8.4")
    def testFramework = "utest.runner.Framework"
  }
}
This is a basic Mill build for a single ScalaModule, with two
third-party dependencies and a test suite using the uTest framework. As a
single-module project, it extends RootModule to mark object foo as the
top-level module in the build. This lets us directly perform operations
./mill compile or ./mill run without needing to prefix it as
foo.compile or foo.run.
You can download this example project using the download link above
if you want to try out the commands below yourself. The only requirement is
that you have some version of the JVM installed; the ./mill script takes
care of any further dependencies that need to be downloaded.
The source code for this module lives in the src/ folder.
Output for this module (compiled files, resolved dependency lists, …)
lives in out/.
This example project uses two third-party dependencies - MainArgs for CLI argument parsing, Scalatags for HTML generation - and uses them to wrap a given input string in HTML templates with proper escaping.
You can run assembly to generate a standalone executable jar, which then
can be run from the command line or deployed to be run elsewhere.
> ./mill resolve _ # List what tasks are available to run
assembly
...
clean
...
compile
...
run
...
show
...
inspect
...
> ./mill inspect compile # Show documentation and inputs of a task
compile(ScalaModule.scala:...)
Compiles the current module to generate compiled classfiles/bytecode.
Inputs:
scalaVersion
upstreamCompileOutput
allSourceFiles
compileClasspath
> ./mill compile # compile sources into classfiles
...
compiling 1 Scala source to...
> ./mill run # run the main method, if any
error: Missing argument: --text <str>
> ./mill run --text hello
<h1>hello</h1>
> ./mill test
...
+ foo.FooTests.simple ... <h1>hello</h1>
+ foo.FooTests.escaping ... <h1><hello></h1>
> ./mill assembly # bundle classfiles and libraries into a jar for deployment
> ./mill show assembly # show the output of the assembly task
".../out/assembly.dest/out.jar"
> java -jar ./out/assembly.dest/out.jar --text hello
<h1>hello</h1>
> ./out/assembly.dest/out.jar --text hello # mac/linux
<h1>hello</h1>The output of every Mill task is stored in the out/ folder under a name
corresponding to the task that created it. e.g. The assembly task puts its
metadata output in out/assembly.json, and its output files in
out/assembly.dest. You can also use show to make Mill print out the
metadata output for a particular task.
Additional Mill tasks you would likely need include:
$ mill runBackground # run the main method in the background

$ mill clean <task>  # delete the cached output of a task, terminate any runBackground

$ mill launcher      # prepares a foo/launcher.dest/run you can run later

$ mill jar           # bundle the classfiles into a jar suitable for publishing

$ mill -i console    # start a Scala console within your project

$ mill -i repl       # start an Ammonite Scala REPL within your project
You can run mill resolve __ to see a full list of the different tasks that
are available, mill resolve _ to see the tasks within foo,
mill inspect compile to inspect a task’s doc-comment documentation or what
it depends on, or mill show foo.scalaVersion to show the output of any task.
The most common tasks that Mill can run are cached targets, such as
compile, and un-cached commands such as foo.run. Targets do not
re-evaluate unless one of their inputs changes, whereas commands re-run every
time.
Custom Build Logic
Mill makes it very easy to customize your build graph, overriding portions
of it with custom logic. In this example, we override the JVM resources of
our ScalaModule - normally the resources/ folder - to instead contain a
single generated text file containing the line count of all the source files
in that module
import mill._, scalalib._

object foo extends RootModule with ScalaModule {
  def scalaVersion = "2.13.11"

  /** Total number of lines in module's source files */
  def lineCount = T{
    allSourceFiles().map(f => os.read.lines(f.path).size).sum
  }

  /** Generate resources using lineCount of sources */
  override def resources = T{
    os.write(T.dest / "line-count.txt", "" + lineCount())
    Seq(PathRef(T.dest))
  }
}
The addition of lineCount and resources overrides the previous resource
folder provided by JavaModule (labelled resource.super below), replacing
it with the destination folder of the new resources target, which is wired
up lineCount:

> mill run
...
Line Count: 17

> mill show lineCount
17

> mill inspect lineCount
lineCount(build.sc:...)
    Total number of lines in module's source files
Inputs:
    allSourceFiles
Above, def lineCount is a new build target we define, which makes use of
allSourceFiles (an existing target) and is in-turn used in our override of
resources (also an existing target). os.read.lines and os.write come
from the OS-Lib library, which is
bundled with Mill. This generated file can then be
loaded and used at runtime, as see in the output of `mill run
While this is a toy example, it shows how easy it is to customize your Mill build to include the kinds of custom logic common in the build config of most real-world projects.
This customization is done in a principled fashion familiar to most programmers - object-orienting overrides - rather than ad-hoc monkey-patching or mutation common in other build tools. You never have "spooky action at a distance" affecting your build / graph definition, and your IDE can always help you find the final override of any particular build target as well as where any overriden implementations may be defined.
Unlike normal methods, custom user-defined targets in Mill benefit from all
the same things that built-in targets do: automatic caching, parallelism
(with the -j/--jobs flag), inspectability (via show/inspect), and so on.
While these things may not matter for such a simple example that runs quickly, they ensure that custom build logic remains performant and maintainable even as the complexity of your project grows.
Multi-Module Project
import mill._, scalalib._

trait MyModule extends ScalaModule {
  def scalaVersion = "2.13.11"
  object test extends ScalaTests {
    def ivyDeps = Agg(ivy"com.lihaoyi::utest:0.8.4")
    def testFramework = "utest.runner.Framework"
  }
}

object foo extends MyModule {
  def moduleDeps = Seq(bar)
  def ivyDeps = Agg(ivy"com.lihaoyi::mainargs:0.4.0")
}

object bar extends MyModule {
  def ivyDeps = Agg(ivy"com.lihaoyi::scalatags:0.8.2")
}
This example contains a simple Mill build with two modules, foo and bar.
We don’t mark either module as top-level using extends RootModule, so
running tasks needs to use the module name as the prefix e.g. foo.run or
bar.run. You can define multiple modules the same way you define a single
module, using def moduleDeps to define the relationship between them.
Note that we split out the test submodule configuration common to both
modules into a separate trait MyModule. This lets us avoid the need to
copy-paste common settings, while still letting us define any per-module
configuration such as ivyDeps specific to a particular module.
The above builds expect the following project layout:
build.sc
foo/
    src/
        Foo.scala
    resources/
        ...
bar/
    src/
        Bar.scala
    resources/
        ...
out/
    foo/
        compile.json
        compile.dest/
        ...
    bar/
        compile.json
        compile.dest/
        ...
Typically, both source code and output files in Mill follow the module
hierarchy, so e.g. input to the foo module lives in foo/src/ and
compiled output files live in out/foo/compile.dest.
> mill resolve __.run
foo.run
bar.run

> mill foo.run --foo-text hello --bar-text world
Foo.value: hello
Bar.value: <h1>world</h1>

> mill bar.run world
Bar.value: <h1>world</h1>

> mill bar.test
...
...bar.BarTests.simple...
...bar.BarTests.escaping...
Mill’s evaluator will ensure that the modules are compiled in the right order, and recompiled as necessary when source code in each module changes.
You can use wildcards and brace-expansion to select multiple targets at once or to shorten the path to deeply nested targets. If you provide optional target arguments and your wildcard or brace-expansion is resolved to multiple targets, the arguments will be applied to each of the targets.
Wildcard |
Function |
|
matches a single segment of the target path |
|
matches arbitrary segments of the target path |
|
is equal to specifying two targets |
You can use the ` symbol to add another target with optional arguments.
If you need to feed a ` as argument to your target, you can mask it by
preceding it with a backslash (\).
Watch and Re-evaluate
You can use the --watch flag to make Mill watch a task’s inputs,
re-evaluating the task as necessary when the inputs
change:
$ mill --watch foo.compile
$ mill --watch foo.run
$ mill -w foo.compile
$ mill -w foo.run
Mill’s --watch flag watches both the files you are building using Mill, as
well as Mill’s own build.sc file and anything it imports, so any changes to
your build.sc will automatically get picked up.
For long-running processes like web servers, you can use runBackground to make sure they recompile and restart when code changes,
forcefully terminating the previous process even though it may be still alive:
$ mill -w foo.compile
$ mill -w foo.runBackground
Parallel Task Execution
By default, mill will evaluate all tasks in sequence. But mill also supports processing tasks in parallel. This feature is currently experimental and we encourage you to report any issues you find on our bug tracker.
To enable parallel task execution, use the --jobs (-j) option followed by a
number of maximal parallel threads.
Example: Use up to 4 parallel threads to compile all modules:
mill -j 4 __.compileTo use as many threads as your machine has (logical) processor cores use --jobs 0.
To disable parallel execution use --jobs 1. This is currently the default.
mill -j generates an output file in out/mill-chrome-profile.json that can be
loaded into the Chrome browser’s chrome://tracing page for visualization.
This can make it much easier to analyze your parallel runs to find out what’s
taking the most time:
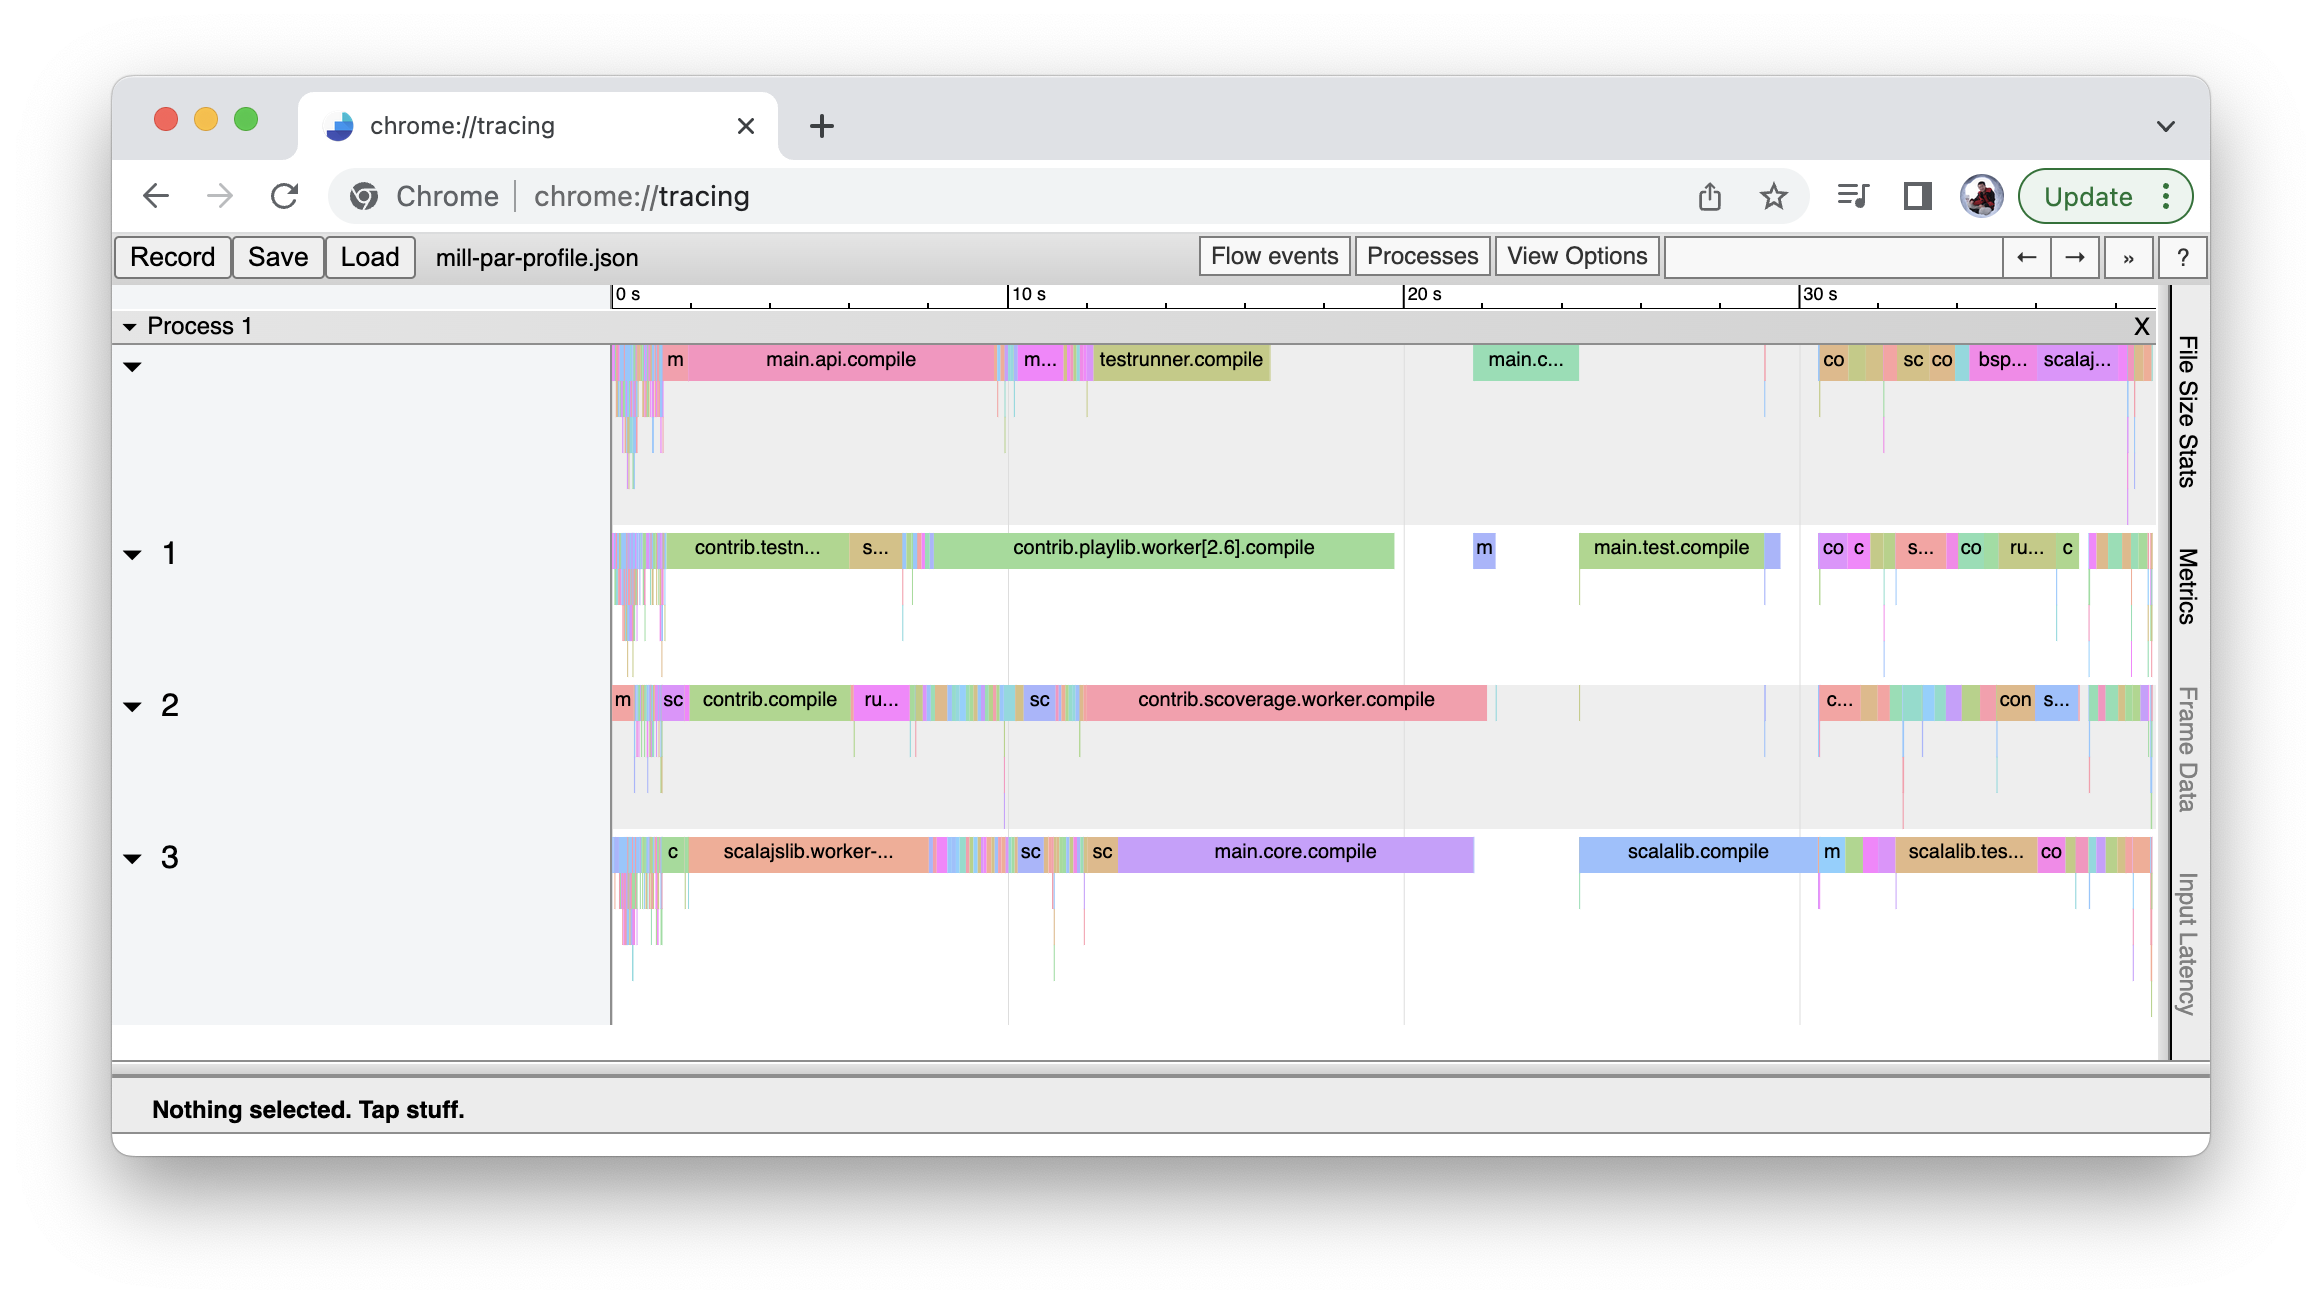
Please note that the maximal possible parallelism depends on your project. Tasks that depend on each other can’t be processed in parallel.
Command-line usage
Mill is a command-line tool and supports various options.
Run mill --help for a complete list of options
mill --helpMill Build Tool, version 0.11.12
usage: mill [options] [[target [target-options]] [+ [target ...]]]
-D --define <k=v> Define (or overwrite) a system property.
-b --bell Ring the bell once if the run completes successfully, twice if
it fails.
--bsp Enable BSP server mode.
--color <bool> Enable or disable colored output; by default colors are enabled
in both REPL and scripts mode if the console is interactive, and
disabled otherwise.
-d --debug Show debug output on STDOUT
--disable-callgraph-invalidation Disable the fine-grained callgraph-based target invalidation in
response to code changes, and instead fall back to the previous
coarse-grained implementation relying on the script `import
$file` graph
--disable-ticker Disable ticker log (e.g. short-lived prints of stages and
progress bars).
--enable-ticker <bool> Enable ticker log (e.g. short-lived prints of stages and
progress bars).
-h --home <path> (internal) The home directory of internally used Ammonite script
engine; where it looks for config and caches.
--help Print this help message and exit.
-i --interactive Run Mill in interactive mode, suitable for opening REPLs and
taking user input. This implies --no-server and no mill server
will be used. Must be the first argument.
--import <str> Additional ivy dependencies to load into mill, e.g. plugins.
-j --jobs <int> Allow processing N targets in parallel. Use 1 to disable
parallel and 0 to use as much threads as available processors.
-k --keep-going Continue build, even after build failures.
--meta-level <int> Experimental: Select a meta-build level to run the given
targets. Level 0 is the normal project, level 1 the first
meta-build, and so on. The last level is the built-in synthetic
meta-build which Mill uses to bootstrap the project.
--no-server Run Mill in single-process mode. In this mode, no Mill server
will be started or used. Must be the first argument.
-s --silent Make ivy logs during script import resolution go silent instead
of printing; though failures will still throw exception.
-v --version Show mill version information and exit.
-w --watch Watch and re-run your scripts when they change.
target <str>... The name or a pattern of the target(s) you want to build,
followed by any parameters you wish to pass to those targets. To
specify multiple target names or patterns, use the `+`
separator.All options must be given before the first target.