Why Use Mill?
Although the Java language is known for being performant, easy to learn, and with great IDEs, JVM build tools have a reputation for being sluggish and confusing. For example, common build tools like Maven or Gradle compile Java code 12-16x slower than the underlying Java compiler. While these tools are the important foundation of the Java ecosystem, it is hard to deny that there exists room for improvement.
Mill tries to provide a viable alternative build tool with 3 major improvements over other JVM build tools available today:
-
Performance: Mill offers a 3-6x speedup in compilation and other common workflows, which means less time waiting for your build tool and more time doing useful work
-
Extensibility: Mill lets you write code or use any published JVM library in your build, customizing it exactly to your needs without being limited by third-party plugins
-
IDE Support: Mill has better IDE support in IntelliJ and VSCode than other build tools, to help you navigate your build understand why your build is doing what it is doing
Uniquely among build tools, Mill builds upon the idea of Object-Oriented Builds. Where most builds invent custom concepts and abstractions for setting up your build pipelines, Mill instead re-uses familiar concepts from object-oriented programming: methods, classes, and overrides. This means any Java developer can feel immediately at home extending and maintaining their Mill builds without needing to first become an expert in the build-tool lifecycle or plugin API.
At a first glance, Mill looks like any other build tool. You have build files, you configure dependencies, you can compile, run, or test your project:
// build.mill
package build
import mill.*, javalib.*

object foo extends JavaModule {
  def mvnDeps = Seq(
    mvn"net.sourceforge.argparse4j:argparse4j:0.9.0",
    mvn"org.thymeleaf:thymeleaf:3.1.1.RELEASE"
  )

  object test extends JavaTests, TestModule.Junit4
}
> /mill foo.compile
compiling 1 Java source...
> /mill foo.run --text hello
<h1>hello</h1>
> ./mill foo.test
Test foo.barTest.testEscaping finished, ...
Test foo.barTest.testSimple finished, ...
0 failed, 0 ignored, 2 total, ...However, beyond the basics, Mill does provide a lot that other JVM build tools do not. We will look at each topic in turn:
Performance
Maven
Overall across our benchmarks, Mill is 4-6x faster than Maven for clean compiles, both parallel and sequential, and for many modules or for a single module:
Benchmark |
Maven |
Mill |
Speedup |
98.80s |
23.41s |
4.2x |
|
48.92s |
9.29s |
5.3x |
|
4.89s |
0.88s |
5.6x |
|
6.82s |
0.18s |
37.9x |
|
5.25s |
0.12s |
43.8x |
First, let’s look at Parallel Clean Compile All.
This benchmark involves running clean to delete all generated files and re-compiling
everything in parallel. Mill sees a significant ~5x speedup over Maven for this benchmark.
You can click on the link above to see a more detailed discussion of how this benchmark was
run.
The second benchmark worth noting is Incremental Compile Single Module.
This benchmark involves adding a single newline to the end of a single already-compiled file in common,
and re-compiling common and common.test.
Mill sees a huge speedup for this benchmark, because Mill’s incremental compiler
(Zinc) is able to detect that only one file in one module
has changed, and that the change is small enough
to not require other files to re-compile. In contrast, Maven re-compiles all files in both
modules, even though only one file was touched and the change was trivial.
Gradle
The comparison with Gradle is less stark, but still significant. Mill is 3-4x faster than Gradle across the various workflows:
Benchmark |
Gradle |
Mill |
Speedup |
17.6s |
5.86s |
3.0x |
|
12.3s |
3.75s |
3.3x |
|
4.41s |
1.30s |
3.4x |
|
1.37s |
0.20s |
6.9x |
|
0.94s |
0.11s |
8.5x |
Mill’s various "clean compile" workflows 3-4x faster than Gradle’s, while it’s incremental and no-op compile workflows are 7-9x faster. Both Gradle and Mill appear to do a good job limiting the compilation to only the changed file, but Mill has less fixed overhead than Gradle does, finishing in about ~0.2s rather than ~1.5 seconds.
In general, these benchmarks don’t show Mill doing anything that Maven or Gradle do not: these are equivalent builds for the same projects (Netty and Mockito respectively), compiling the same number of files using the same Java compiler, in the same module structure and passing the same suite of tests. Rather, what we are seeing is Mill simply having less build-tool overhead than Maven or Gradle, so the performance of the underlying JVM and Java compiler (which is actually pretty fast!) can really shine through.
Not Just Compile Times
Compilation times are only one part of the time taken during development. Mill also provides features that help speed up other parts of your development cycle:
-
Selective Test Execution allows you to skip unrelated tests when validating pull requests, speeding up PR validation considerably
-
Test Parallelism automatically distributes tests across multiple threads, utilizing all available cores while maintaining long-lived JVM processes to maximize performance
-
Incremental Assembly Jar Creation speeds up creation of assembly jars, greatly speeding up workflows that use them (e.g. Spark Submit)
-
Build Performance Profiles are automatically generated for every command, giving visibility into where the build tool is spending time so you can understand and optimize it.
None of these features are rocket science, and they are all things that you can in theory set up with other build tools. However, Mill provides these features built-in without needing to first hunt down plugins or third-party integrations, and makes all of them easy to set up and use.
Extensibility
Rich Builtins
Mill comes with a lot more functionality built in than other tools such as Maven, Gradle, or SBT. In general, most common development workflows are built in to Mill: autoformatting, autofixing, publishing, packaging, etc. This means you can go very far with just Mill’s builtin functionality, without first needing to trawl the internet to find plugins and evaluate their relevance, quality, and level of maintenance:
Languages Dependency Management Testing Linting |
Packaging Publishing Web Frameworks Others |
Mill’s builtin functionality means you can get very far without spending time fiddling with plugins. These builtins are all designed, tested, and maintained to the same level of quality as Mill itself, letting you skip the tedious task of finding and vetting a list of third-party plugins of appropriate quality for use in your project.
When the time comes that you do need functionality not bundled with Mill, Mill also has a rich ecosystem of third party plugins for less common use cases:
Extending Mill
When you do need to extend it, Mill allows you to directly write code to configure your build, and even download libraries from Maven Central.
Most build tools need plugins to do anything: if you want to Foo you need a Foo plugin, if you want to Bar you need a Bar plugin, for any possible Foo or Bar. These could be simple tasks - zipping up files, pre-rendering web templates, preparing static assets for deployment - but even a task that would be trivial to implement in a few lines of code requires you to Google for third-party plugins, dig through their Github to see which one is best maintained, and hope for the best when you include it in your build. And while you could write plugins yourself, doing so is usually non-trivial.
Mill is different. Although Mill does have plugins supporting common integrations (linked above),
for most simple things you can directly write code to achieve what you want, using the bundled
filesystem, subprocess, and dependency-management libraries. And even if you need third-party
libraries from Maven Central to do xyz, you can directly import the “xyz” library and use it
directly, without having to find a "xyz build plugin" wrapper.
Simple Custom Tasks
The following Mill build is a minimal Java module foo. It contains no custom configuration, and
so inherits all the defaults from mill.javalib.JavaModule: default source folder layout, default
assembly configuration, default compiler flags, and so on. This convention over configuration
is a philosophy that Mill inherited from Maven and other JVM build tools:
package build
import mill.*, javalib.*

object foo extends JavaModule {
}
> mill compile
Compiling 1 Java source...If you want to add a custom task, this is as simple as defining a method e.g.
def lineCount = Task { ... }. The body of Task performs the action we want, and
can depend on other tasks such as allSourceFiles() below:
package build
import mill.*, javalib.*

object foo extends JavaModule {
  /** Total number of lines in module source files */
  def lineCount = Task {
    allSourceFiles().map(f => os.read.lines(f.path).size).sum
  }
}
Once we define a new task, we can immediately begin using it in our build.
lineCount is not used by any existing JavaModule tasks, but we can still
show its value via the Mill command line to evaluate it, or inspect its metadata:
> ./mill show foo.lineCount
17

> ./mill inspect foo.lineCount
foo.lineCount(build.mill:4)
    Total number of lines in module source files

Inputs:
    foo.allSourceFiles
Note that as lineCount is a Task, we get automatic caching, invalidation, and
parallelization: these are things that every Task gets for free, without the task
author to do anything. And although we wrote the lineCount logic in the main
build.mill file for this example, if it grows complex enough to get messy it is
easy to move it to your own custom plugins
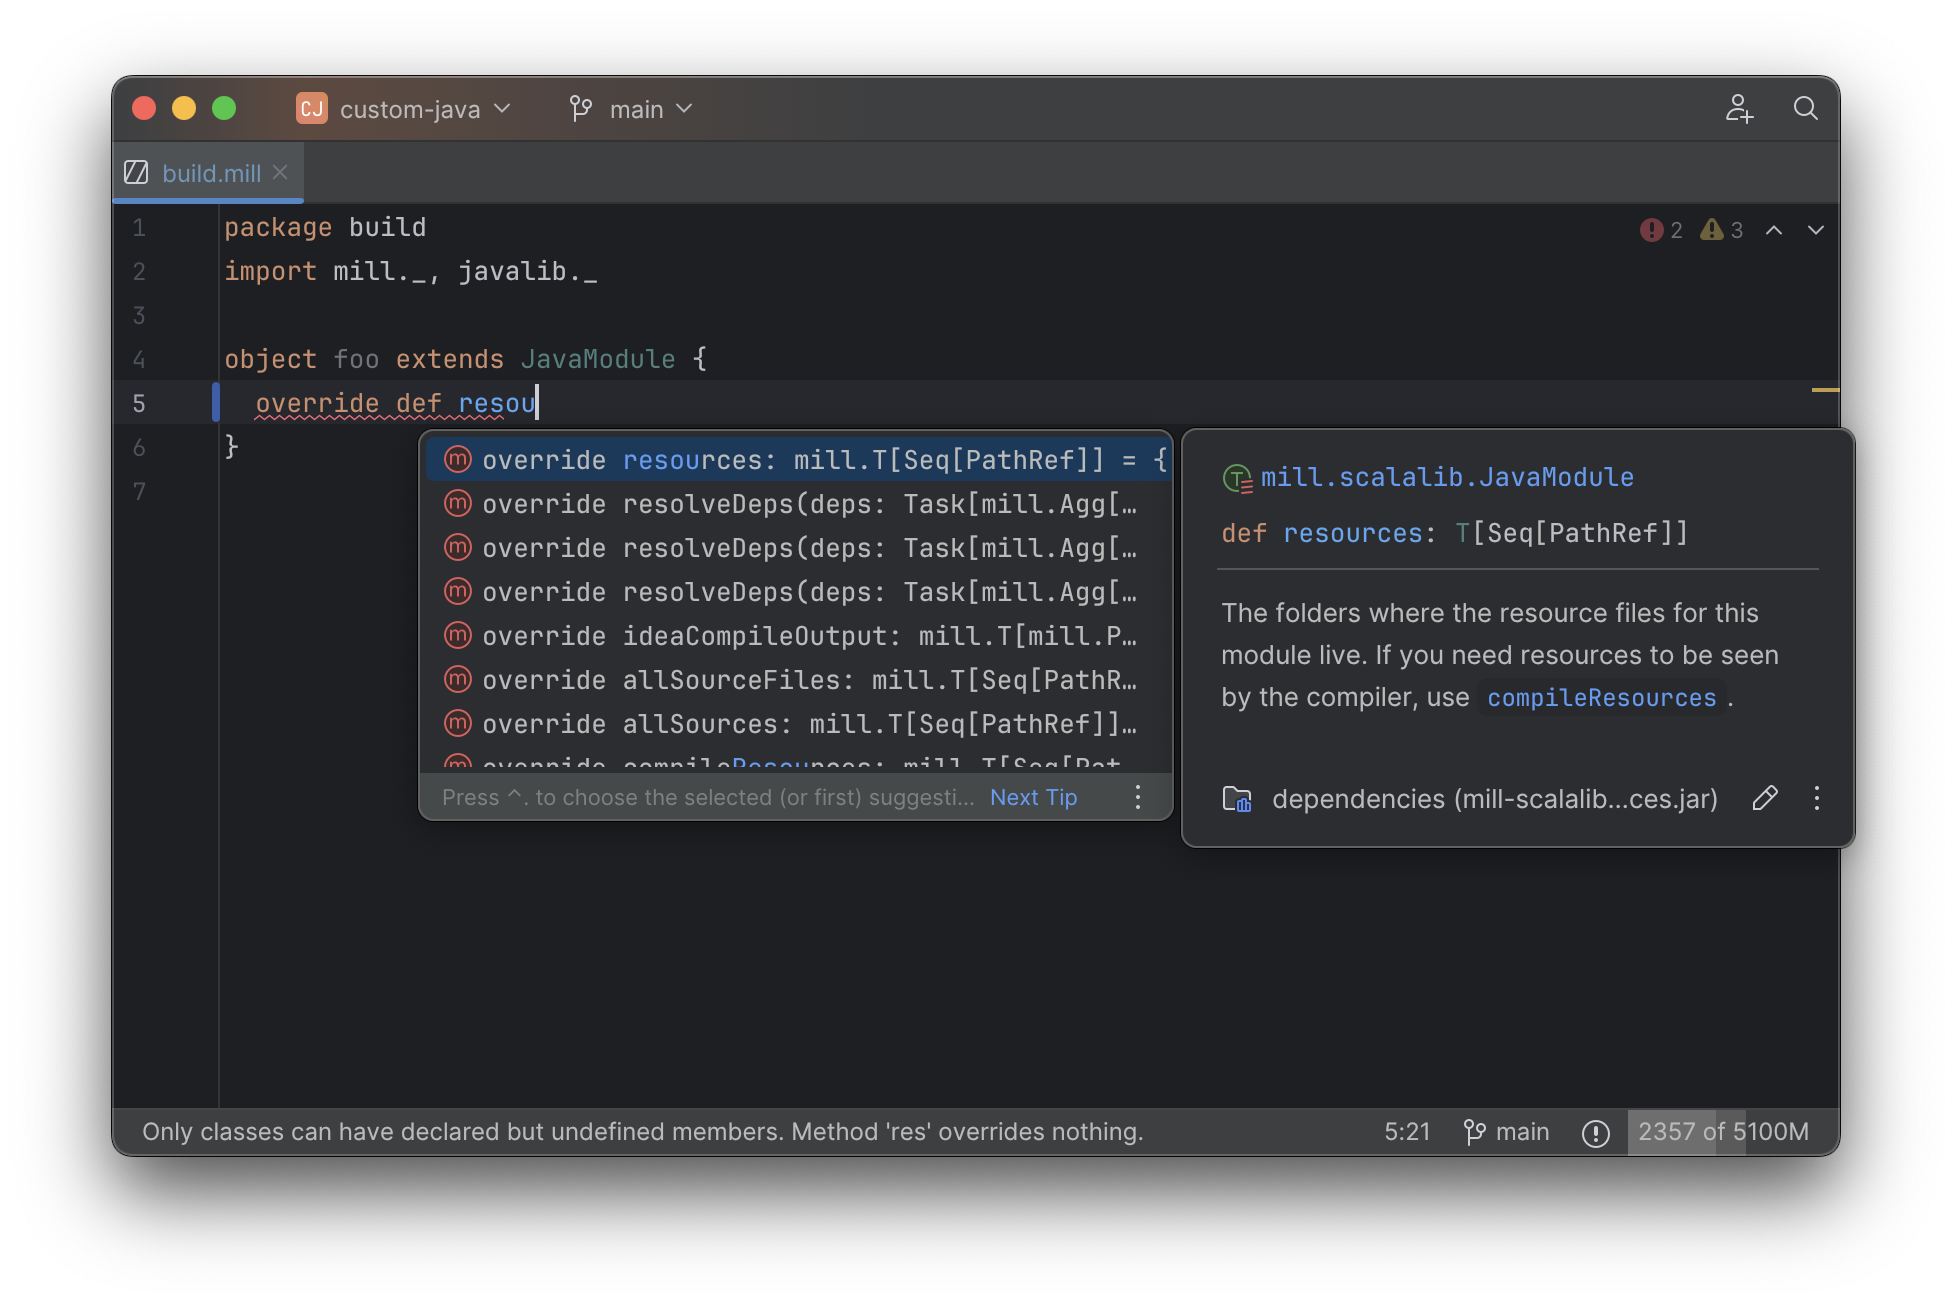
Overriding Tasks
To wire up lineCount into our main JavaModule compile/test/run tasks,
one way is to take the line count value and write it to a JVM resource file
to be used at runtime. In Mill your JVM resources are just a method def resources,
so we can override it and make it depend on lineCount, in addition
to its prior value super.resources() (that references the resources/ folder on disk):
package build
import mill.*, javalib.*

object foo extends JavaModule {
  /** Total number of lines in module source files */
  def lineCount = Task {
    allSourceFiles().map(f => os.read.lines(f.path).size).sum
  }

  /** Generate resources using lineCount of sources */
  override def resources = Task {
    os.write(Task.dest / "line-count.txt", "" + lineCount())
    super.resources() ++ Seq(PathRef(Task.dest))
  }
}
Because our def resources overrides the existing resources method inherited from JavaModule,
the downstream tasks automatically now use the new override instead, similar to any Java
method overrides. That means if you call mill foo.run, it will automatically pick up the new
resources including the generated line-count.txt file and make it available to
the application code to use e.g. to print it out at runtime:
> mill foo.run
Line Count: 18
Next, we’ll look at a more realistic example, which includes usage of third-party libraries in the build.
Using Third-Party JVM Libraries in Tasks
Many build tasks require third-party libraries. One example is pre-rendering HTML pages in the build so they can be served at runtime: if a page never changes, rendering it on every request is wasteful, and even rendering it once on startup and then caching it can impact your application startup time. Thus, you may want to move some HTML rendering to build-time, but with traditional build tools such a move is sufficiently inconvenient and complicated that people rarely do it. Other use cases may include custom linters, custom deployment artifacts, custom debugging metadata, and so on.
With Mill, using third-party libraries in your build tasks is very easy. Mill does not ship with a bundled HTML templating engine, but you can use the //| mvnDeps syntax to include one such as Thymeleaf, which would immediately make the Thymeleaf classes available for you to import and use in your build as below:
//| mvnDeps: ["org.thymeleaf:thymeleaf:3.1.1.RELEASE"]
package build

import mill.*, javalib.*
import org.thymeleaf.TemplateEngine
import org.thymeleaf.context.Context

object foo extends JavaModule {
  /** Total number of lines in module source files */
  def lineCount = Task {
    allSourceFiles().map(f => os.read.lines(f.path).size).sum
  }

  def htmlSnippet = Task {
    var context = new Context()
    context.setVariable("heading", "Line Count is: " + lineCount())
    new TemplateEngine().process(
        "<h1 th:text=\"${heading}\"></h1>",
        context
    )
  }

  def resources = Task {
    os.write(Task.dest / "snippet.txt", htmlSnippet())
    super.resources() ++ Seq(PathRef(Task.dest))
  }
}
Once we have specified our //| mvnDeps in the build file YAML header, we can import
TemplateEngine, Context, and follow our def lineCount with a def htmlSnippet task
that uses Thymeleaf to render HTML. We get full IDE support for working with the
Thymeleaf Java API, the new htmlSnippet task is inspectable from the Mill command line
via show, and we wire it up into def resources so it can be inspected and used at
runtime by the application (in this case just printed out):

> mill show foo.htmlSnippet
"<h1>Line count is: 17</h1>"

> mill foo.compile
compiling 1 Java source...
...

> mill foo.run
generated snippet.txt resource: <h1>Line count is: 17</h1>
Rendering HTML using the Thymeleaf templating engine is not rocket science, but what is interesting here is what we did not need to do:
-
We did not need to find a Thymeleaf-Mill plugin in order to include Thymeleaf in our build
-
We did not need to learn a special API or framework for authoring build plugins ourselves to write a plugin to include Thymeleaf in our build
-
We did not need to add fragile shell scripts to augment our build logic and implement the functionality we need.
Instead, we could simply import Thymeleaf as a Java library directly from Maven Central and use it just like we would use it in any Java application, with IDE support, typechecking, and all the necessary build tool features like automatic parallelism, caching, and invalidation.
Mill vs Gradle Configuration as Code
It’s worth contrasting the Mill config above with e.g. the equivalent Gradle configuration for setting up a line-count resource file:
import java.io.File

tasks.register("generateLineCount") {
    val sourceDirs = listOf("src/main/java")
    val outputDir = layout.buildDirectory.dir("generated-resources")
    val outputFile = outputDir.get().file("line-count.txt")

    inputs.files(fileTree("src/main"))
    outputs.file(outputFile)

    doLast {
        var totalLines = 0

        sourceDirs.map(::file).filter { it.exists() }.forEach { srcDir ->
            srcDir.walkTopDown()
                .filter { it.isFile && it.extension in listOf("java") }
                .forEach { file ->
                    totalLines += file.readLines().size
                }
        }

        outputFile.asFile.writeText(totalLines.toString())
        println("Generated line-count.txt with $totalLines lines")
    }
}

tasks.named("processResources") {
    dependsOn("generateLineCount")
    from(layout.buildDirectory.dir("generated-resources"))
}
While the Gradle config is a bit more verbose than Mill’s, that is not where the problem
lies. The problem lies in the fact that the Gradle "config as code" doesn’t actually
look like the code you are writing day-to-day: although it is written in Kotlin,
things like task.named, dependsOn, inputs.files and outputs.file, doLast
(or should we use doFirst?) are not "normal" Kotlin. The stringly-typed "generateLineCount",
"generated-resources", "processResources", values add to the potential for error.
The end result is that although you may know Kotlin as a compiled language with great
IDE support, you will likely be unfamiliar with Gradle’s flavor of Kotlin, and your
IDE will likely not be as useful as you would like.
In fact, there is even a bug in the above Gradle config that will cause the build to be non-deterministically slower sometimes, but not other times. Can you spot it?
The difficulty of catching these issues e.g. during code review illustrates how difficult it is to write "correct" Gradle config: if even the simplest hello-world customization results in impossible-to-find bugs slowing things down, how many bugs will there be in any more-complex real-world customization or plugin? It’s no wonder then than real-world builds using Gradle or other tools often end up being inexplicably slow and flaky! (Click the footnote to see the answer [1])
In contrast, Mill’s extends, defs, and overrides
behave exactly as you would expect any object-oriented program to work, so you already
know how Mill behaves even if you’ve never touched a Mill build before. And the fact
that Mill build config is so much easier to write means that you’re much less likely
to have bugs causing slowness or flakiness, resulting in the improved performance
(discussed above) and not needing to regularly run clean as you often have to do with other
build tools.
Most real projects require some kind of ad-hoc build tasks: you may be pre-processing static assets for web deployment, embedding build metadata for runtime debugging, or generating reports for security scanning. With most build tools, you often needed to pull in some poorly-maintained plugin off of Github, write your own using a complicated plugin framework, or even wrap your build tool in ad-hoc shell scripts. With most other build tools, caching and parallelism are things that the build or plugin author needs to set up manually, meaning everyone makes mistakes and your build system performance is never as good as it could be.
In contrast, Mill makes it easy it is to write concise type-checked code to perform ad-hoc tasks to do whatever you need to do. You get full IDE support, automatic caching and parallelism, and access to the huge JVM library ecosystem on Maven Central. Rather than grabbing unmaintained plugins off of Github or augmenting your build with fragile shell scripts, Mill allows your own custom logic to be implemented in a way that is flexible, performant, and safe, such that anyone can configure their build correctly and achieve maximum performance even without being a build tool expert.
IDE Support
The last area that Mill does better than Maven, Gradle or SBT is providing a seamless IDE experience. Working with Mill builds in IntelliJ or VSCode, you get the full power of your IDE to autocomplete, peek at docs, browse signatures, and otherwise navigate around your build system. Working with your Mill build, you get the same level of IDE support as working within any Java, Scala, or Kotlin application codebase.
Limitations of Existing Build Tool IDE Integrations
While JVM application codebases universally have excellent IDE support, build tools are usually
not nearly as well-supported. For example, consider the snippet below where we are using Gradle to
configure the javac compiler options. The autocomplete and code-assist experience working
with these files is hit-or-miss. In the example below, we can see that IntelliJ is able to
identify that compileArgs exists and has the type List<String>:
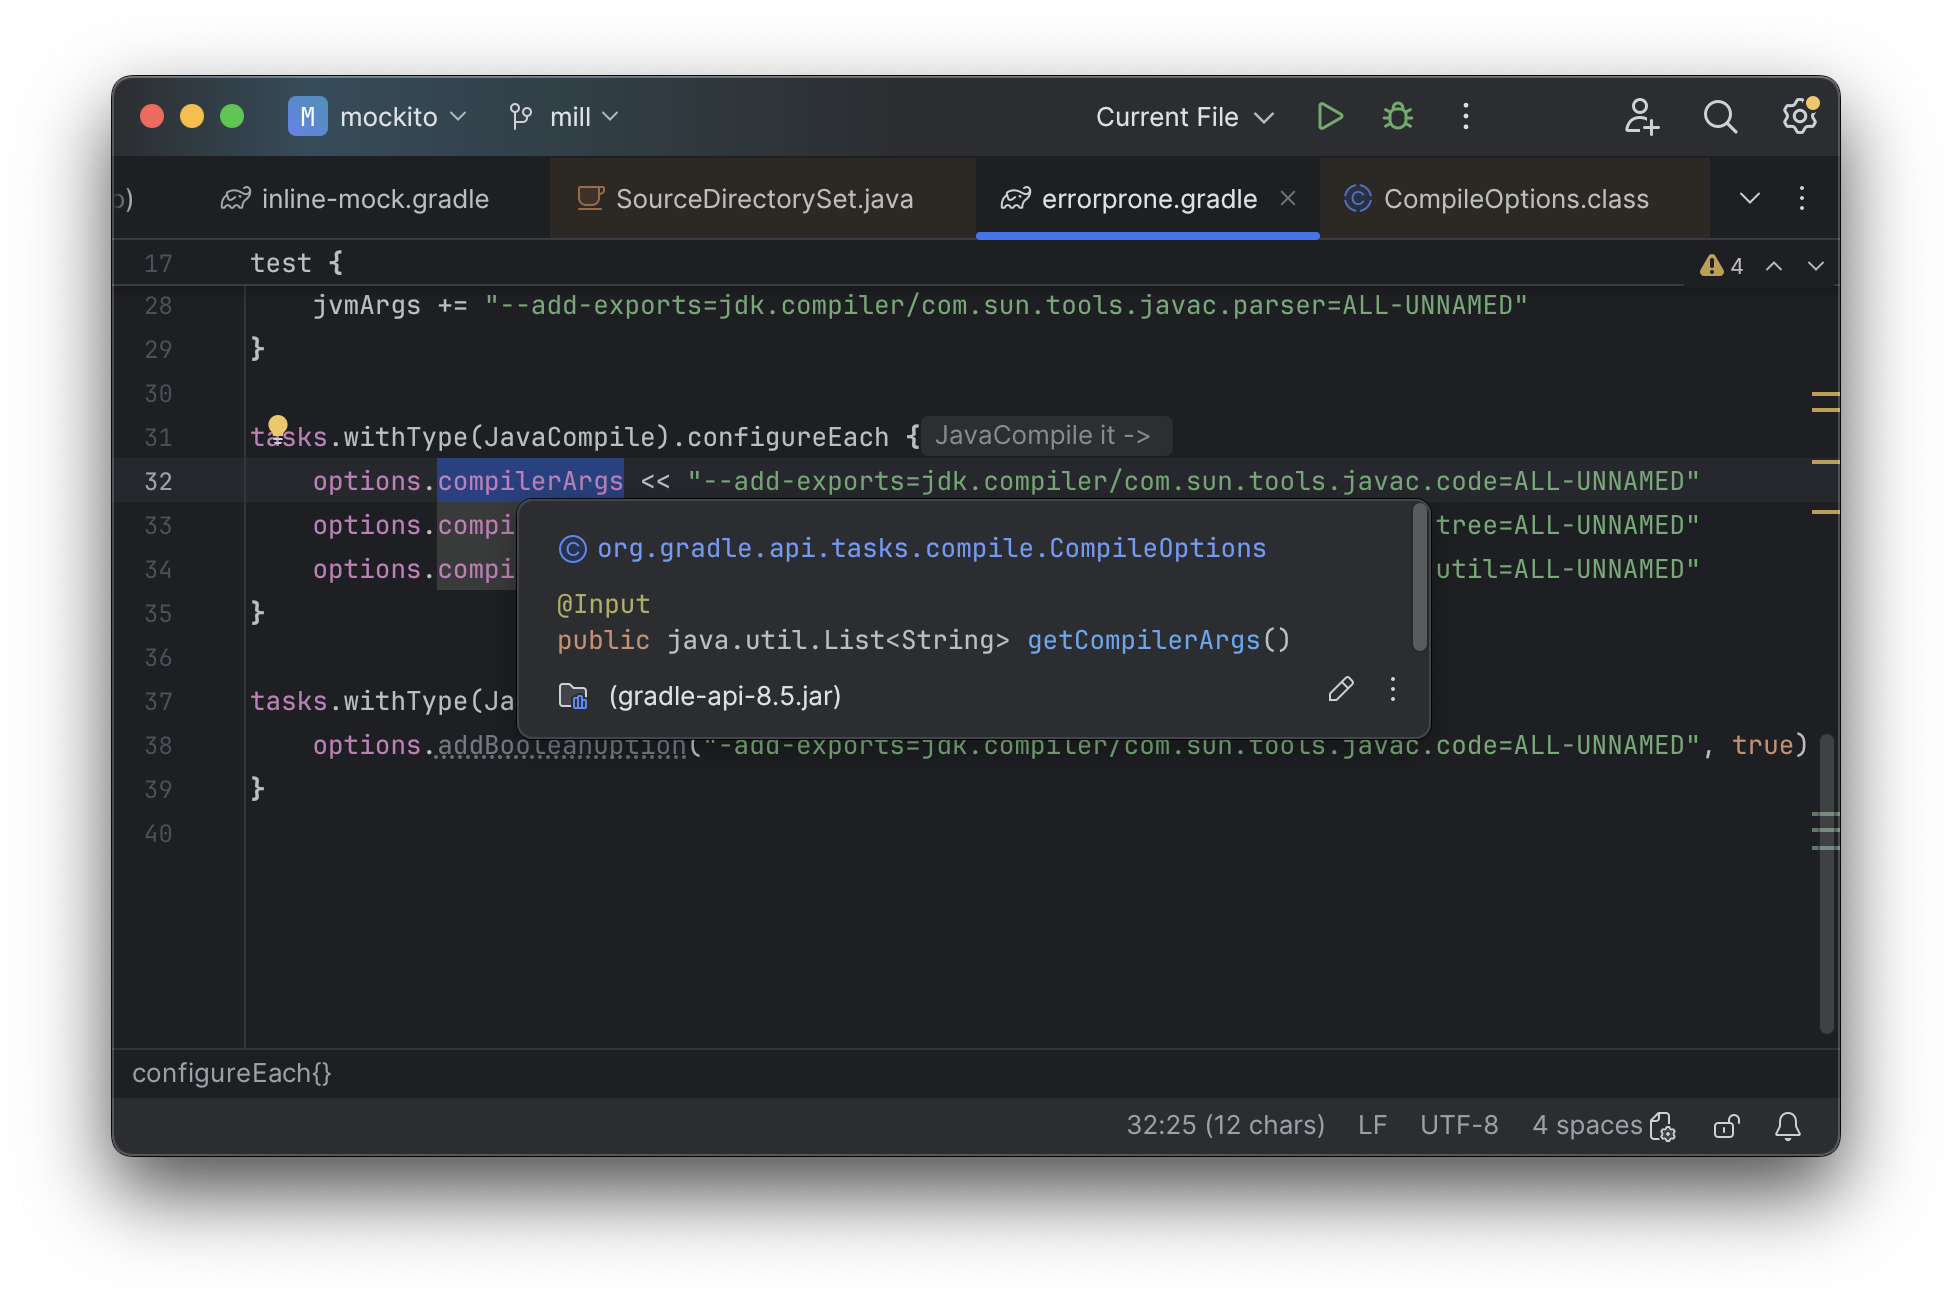
But if you try to jump to definition or find out anything else about it you hit a wall. The IDE is able to bring you to the getter and setter, but it isn’t able to tell you where the value is coming from, how it is computed, or where it is used:
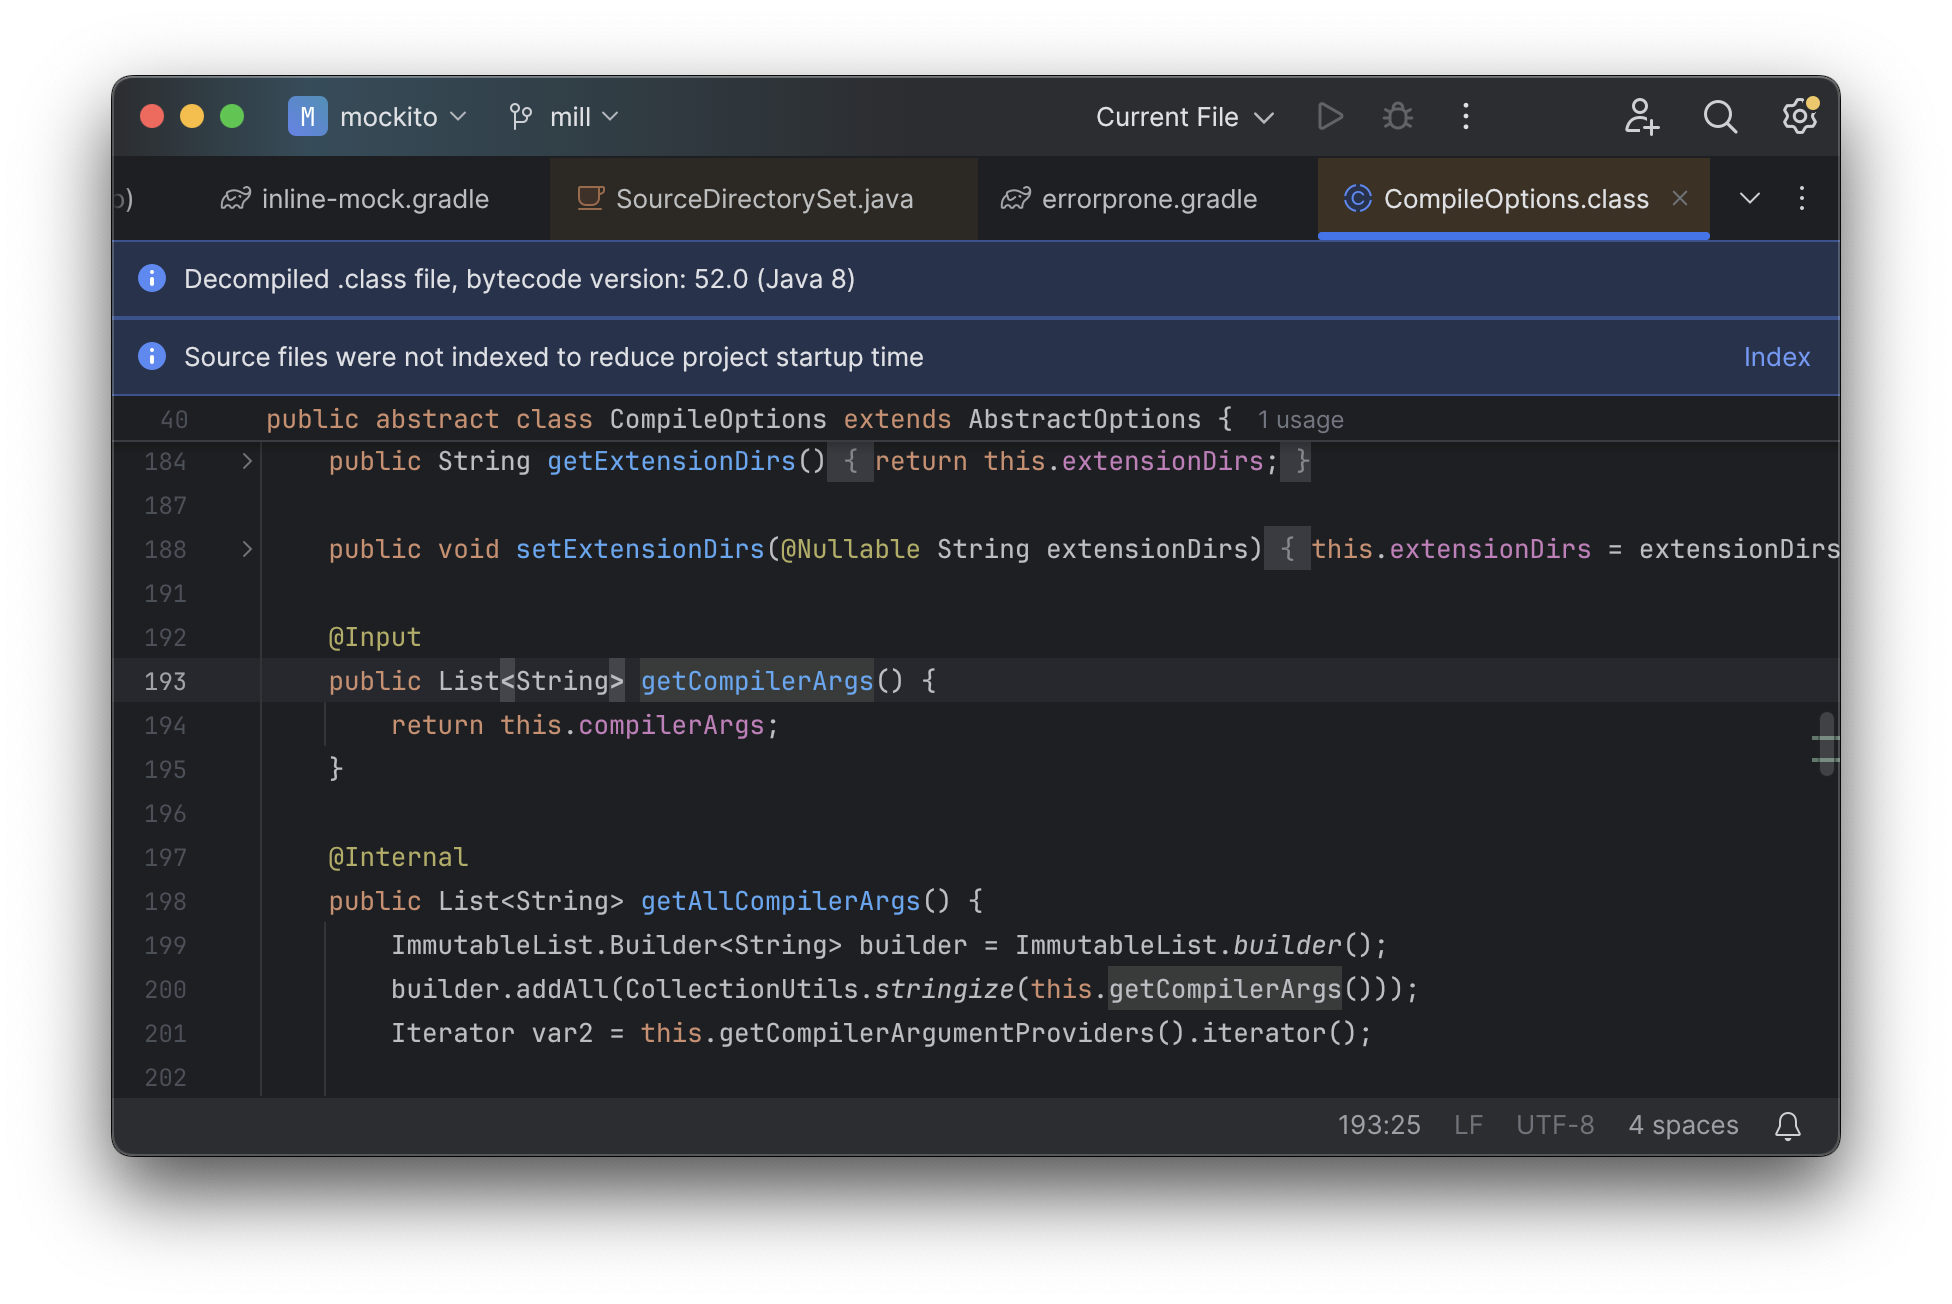
Often working with build configurations feels like hitting dead ends: if you don’t have
options.compilerArgs memorized in your head, there is literally nothing you can do in
your IDE to figure out what it is or what it is used for. That leaves
you googling for answers, which can be a frustrating experience that distracts you from
the task at hand.
Although this example is using Gradle’s un-typed Groovy syntax, the experience using Gradle’s typed Kotlin syntax is largely the same. The problem isn’t unique to Gradle, and isn’t unique to IntelliJ: any IDE would have similar problems working with this code. The problem is the build tool configuration itself, or rather the style of code that most build tools require they be configured with.
Global Mutable Variables
The fundamental problem with build tools like Gradle is that the entire configuration system
is based around global mutable variables. The Groovy or Kotlin code you write does not
actually perform the build, but instead is just setting up some
global mutable data structure that is used to configure the real build engine that
runs later. Thus when you explore the Gradle build in an IDE, the IDE can only explore the
configuration logic (the getCompilerArgs method above) and is unable to explore
the actual build logic (how getCompilerArgs actually gets used in Gradle). And
just because the global mutable variable is wrapped in a getter and setter
does not make it any less global or any less mutable!
The problem with IDEs not being able to understand code written with global mutable variables is not new. If you wrote your application code primarily using global mutable variables, your IDE would not be able to help you much there either! So nobody does that, and instead applications are primarily built using classes and methods, but some how no build tool follows the same style so they all have problems with IDEs not being able to work with their global mutable variables effectively.
The Mill IDE Experience
In comparison, not only are Mill’s .mill files statically typed, they are
built on top of classes and methods like any other JVM codebase. While IDEs struggle
with global variables, they are very good at navigating classes and methods!
For example IntelliJ is able to take your def javacOptions override and
find the original definitions that were overridden, and show you where they are defined:
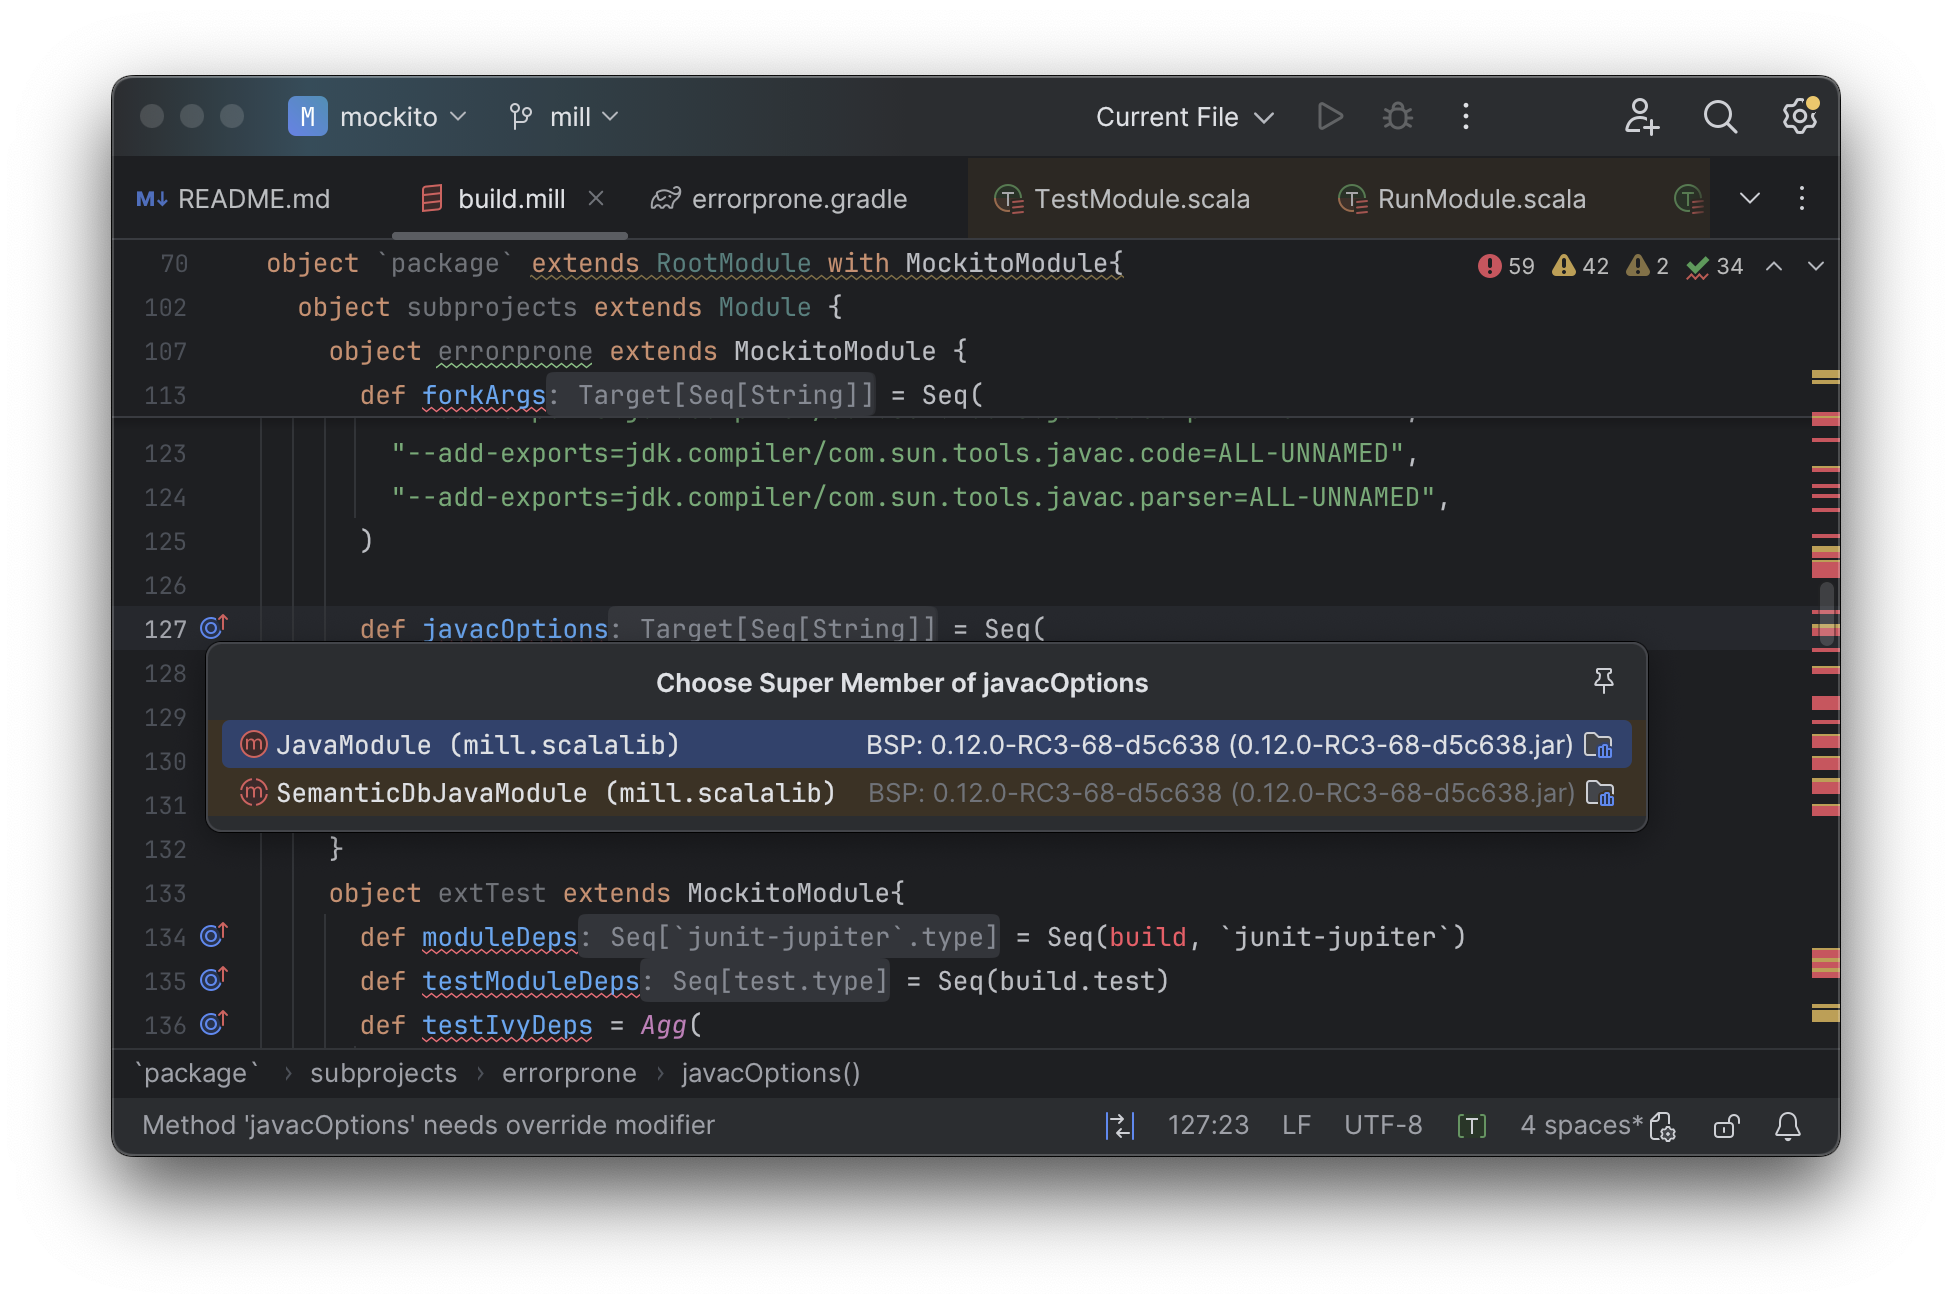
You can jump to any of the overridden defs quickly and precisely:
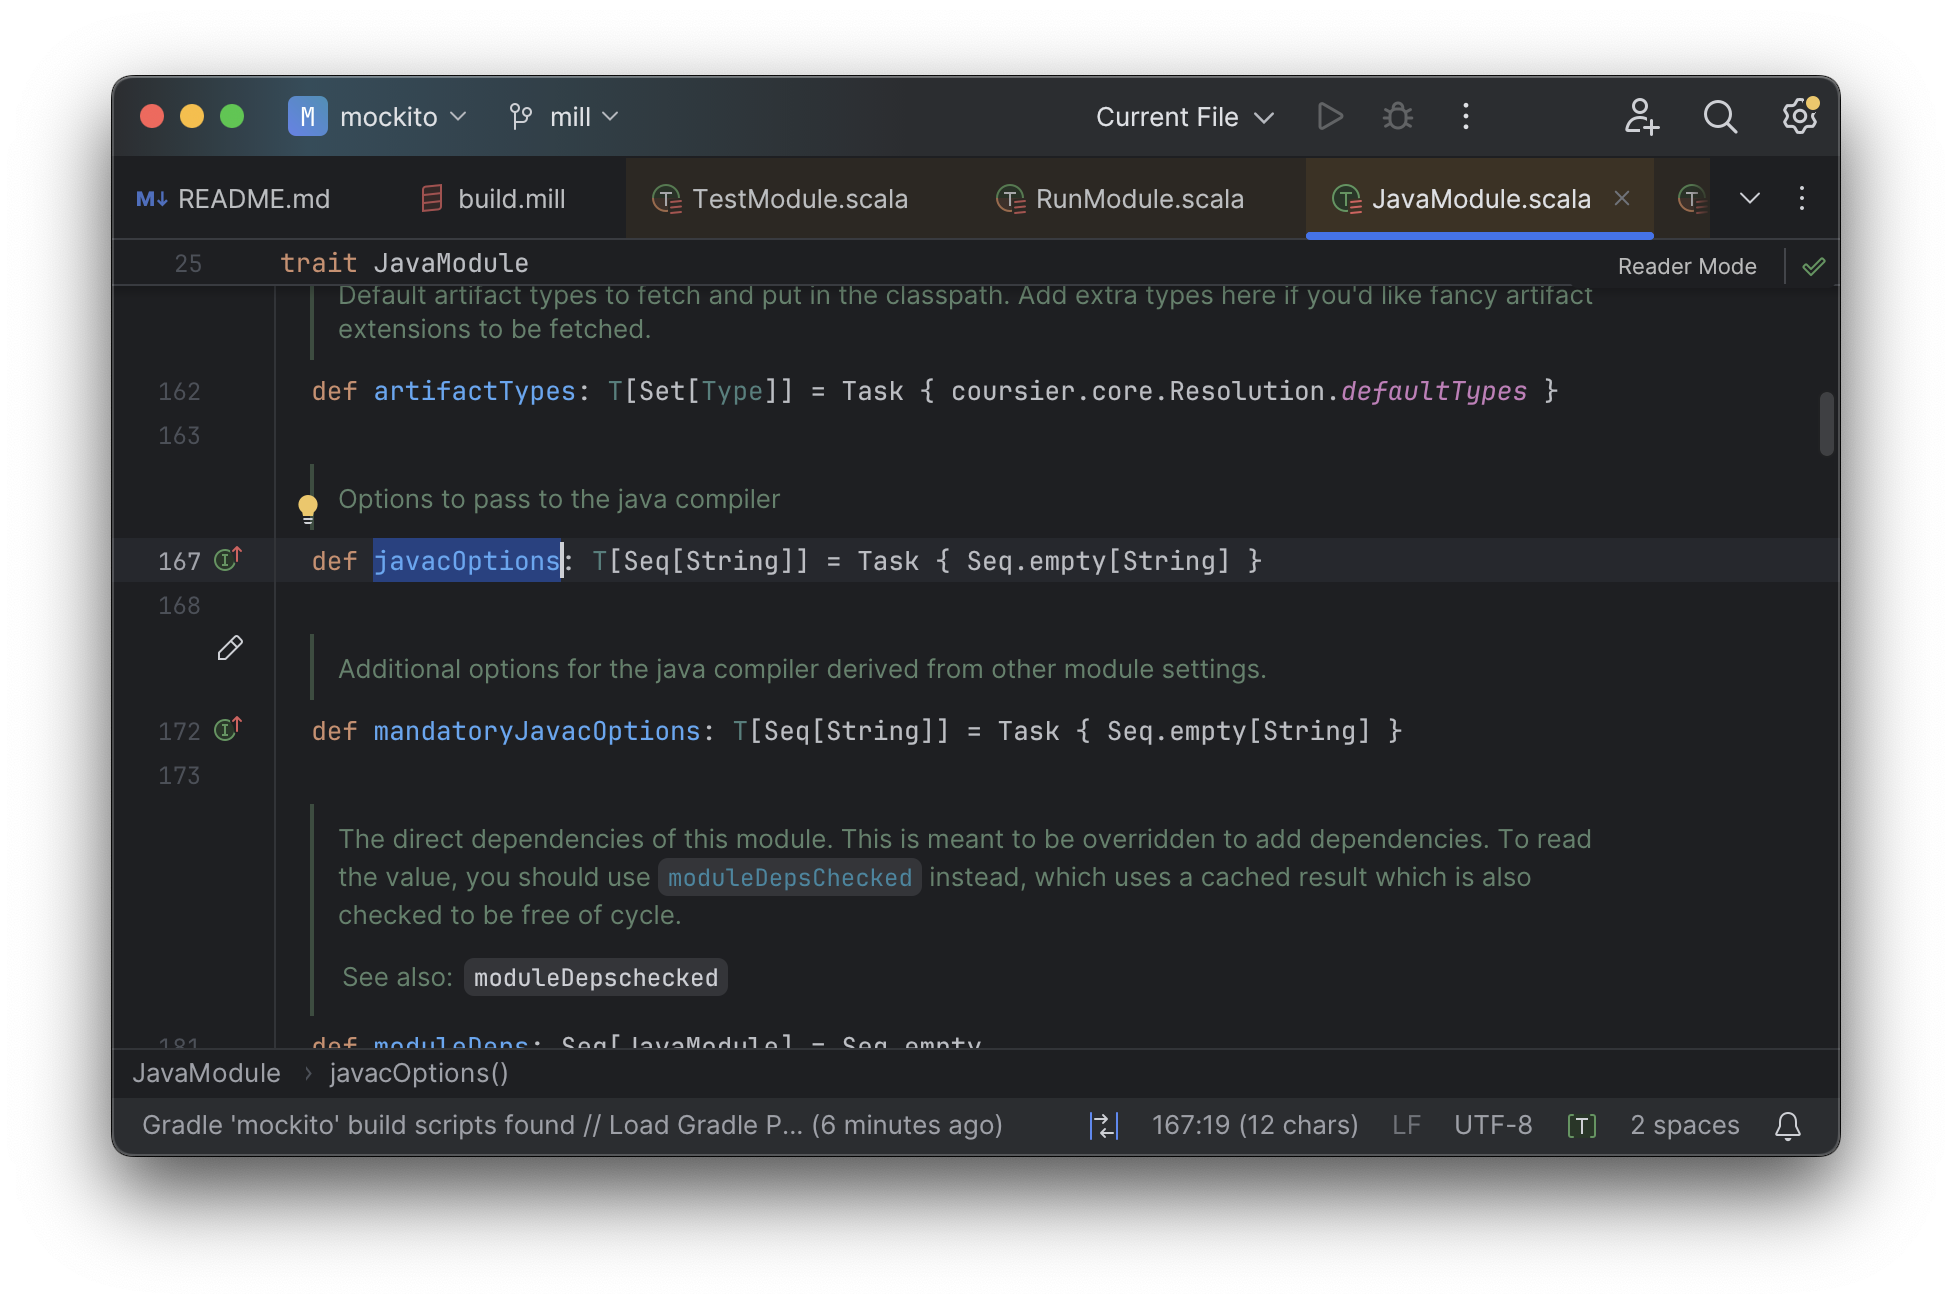
And because tasks in Mill are just normal methods, IntelliJ is
able to find usages, showing you where the task is used. Below, we can see the method
call in the def compile task, which uses javacOptions() along with a number of other tasks:
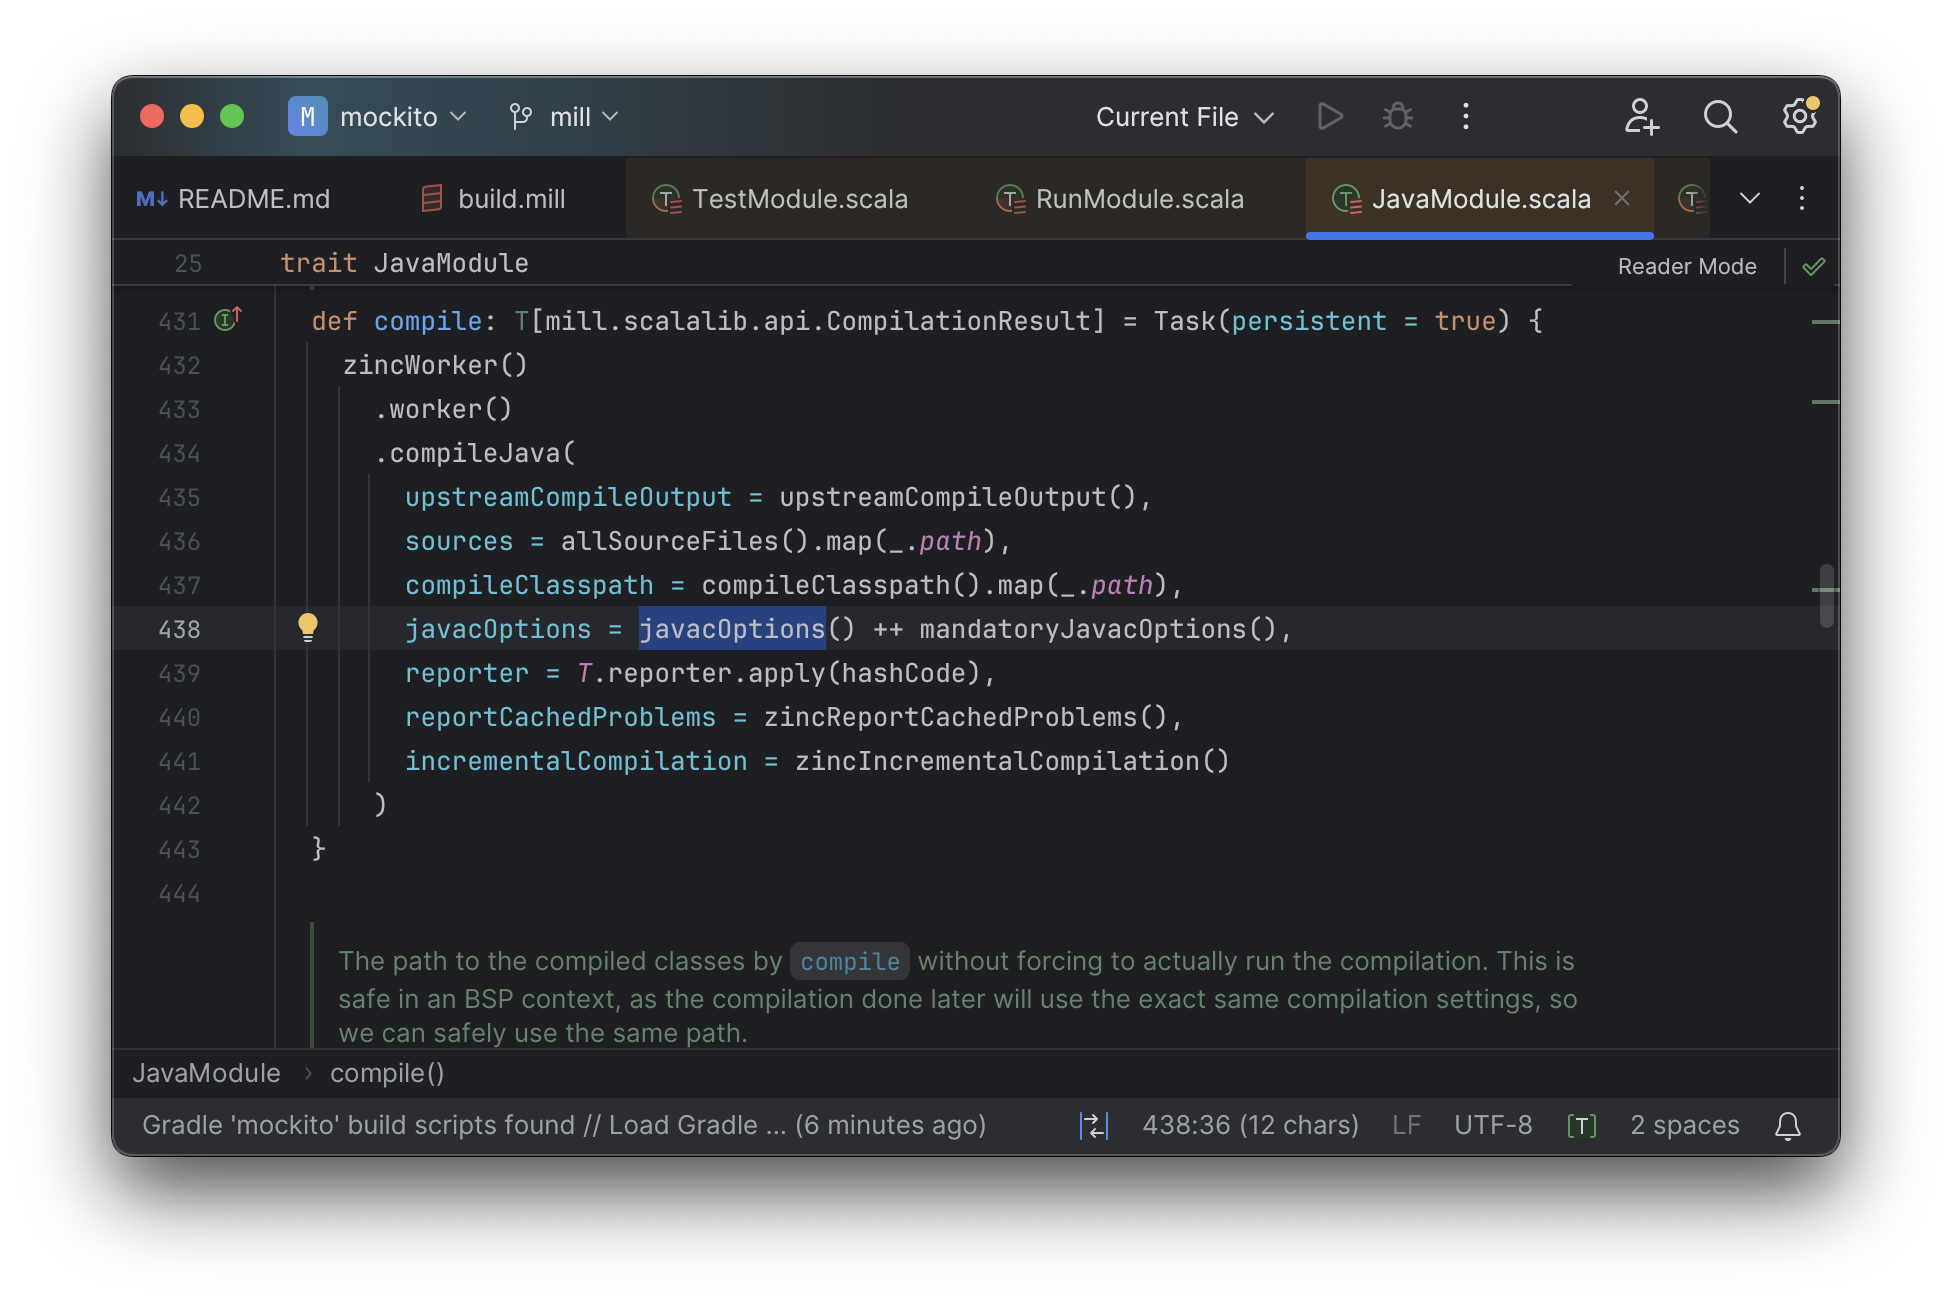
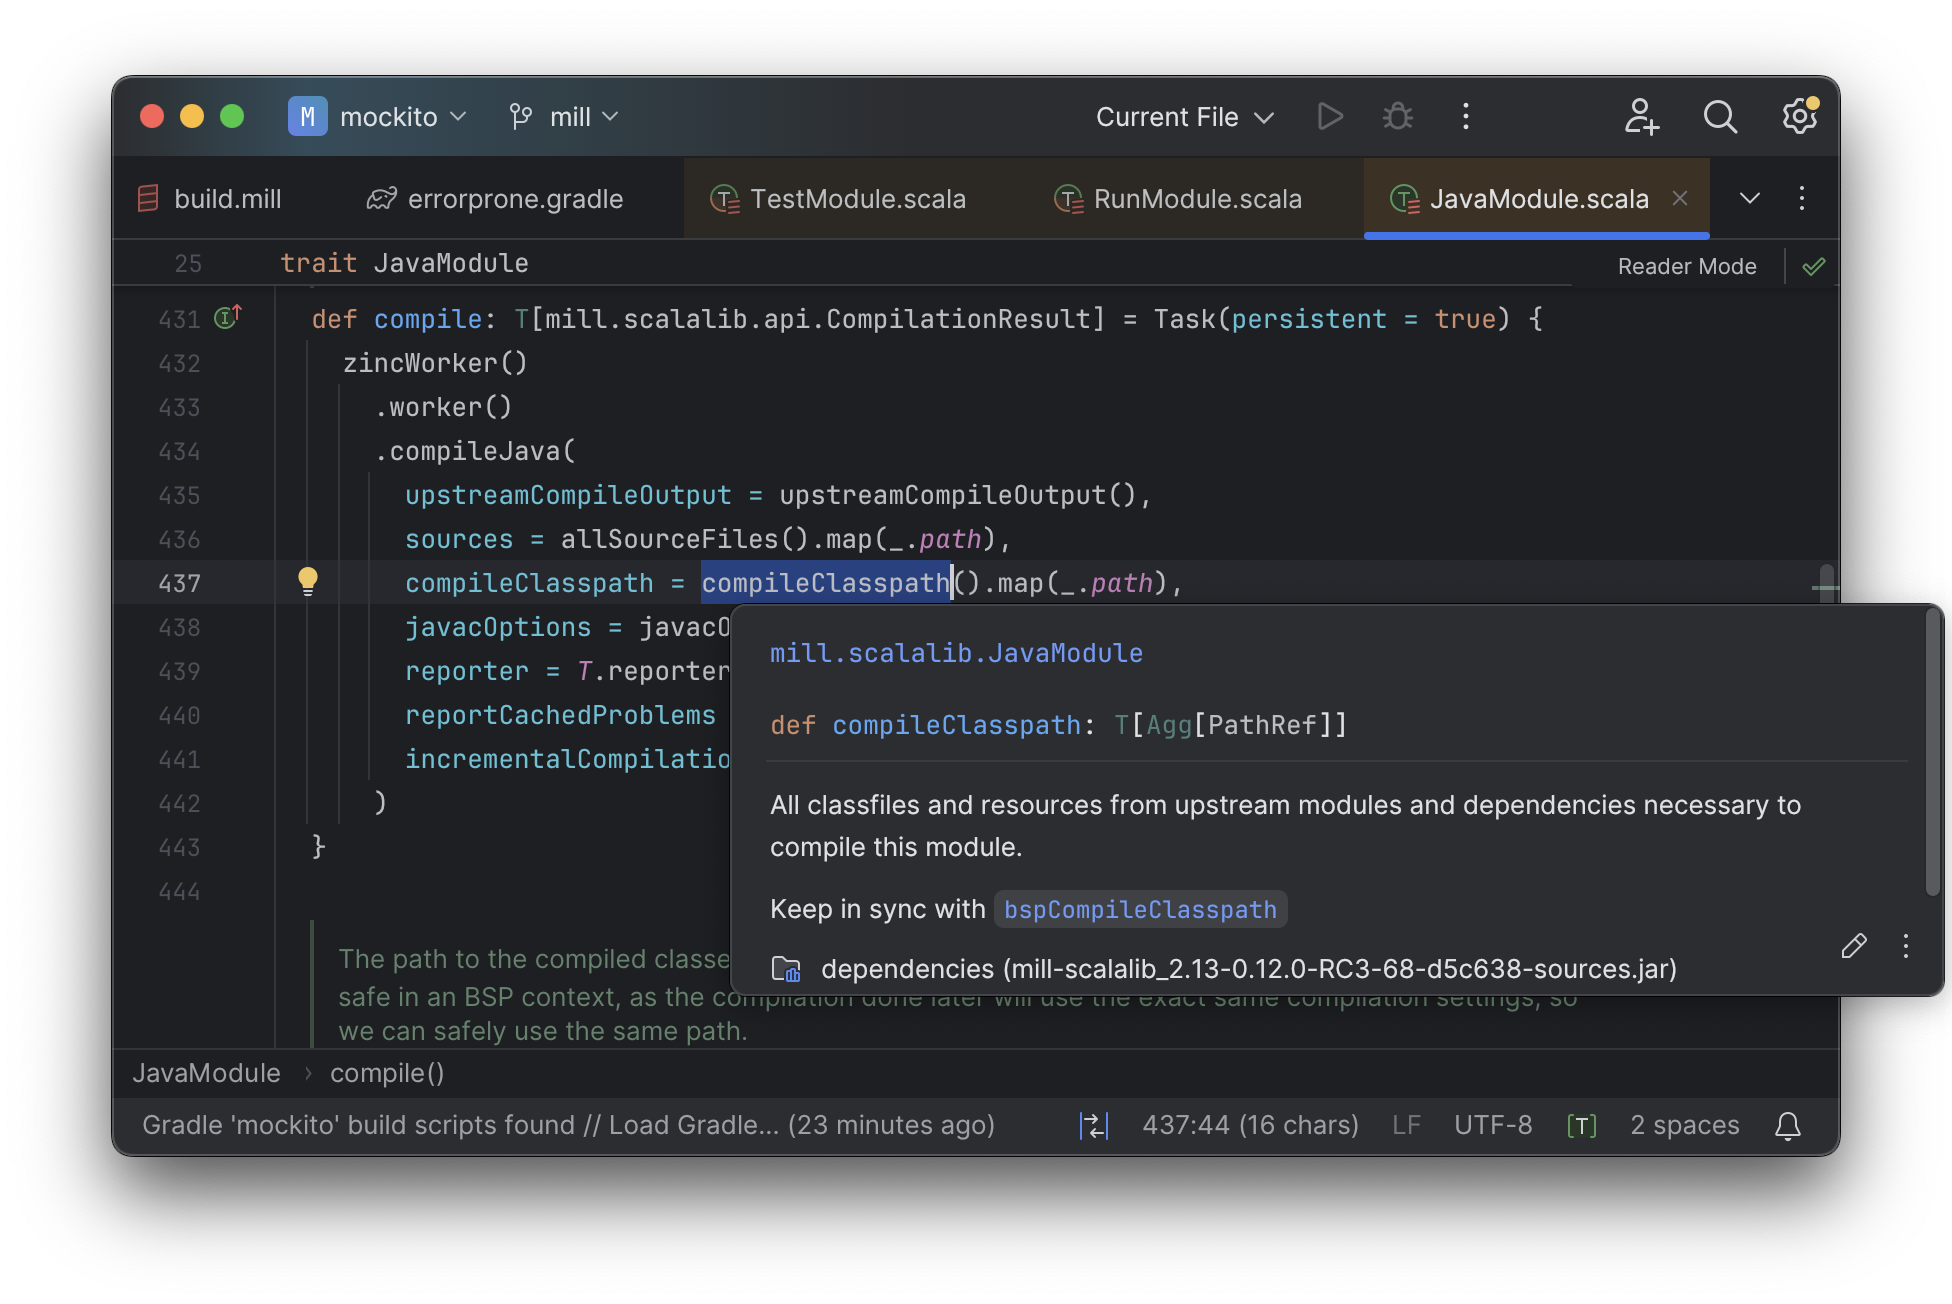
From there, if you are curious about any of the other tasks used alongside javacOptions, it’s
easy for you to pull up their documentation, jump to their
definition, or find their usages. For example we can pull up the docs of
compileClasspath() below, jump to its implementation, and continue
interactively exploring your build logic from there:
Unlike most other build tools, Mill build pipelines can be explored interactively in your IDE. If you do not know what something does, it’s documentation, definition, or usages is always one click away in IntelliJ or VSCode. This isn’t a new experience for Java developers, as it is what you experience every day working in your application code! But Mill brings that same polished experience to your build system - traditionally something that has been opaque and hard to understand - and does so in a way that no other build tool does. And this is possible because Mill builds avoid the global mutable variables common in other build tools, in favor of configuring your build via classes and methods that are familiar to both users and to IDEs.
Object-Oriented Builds
Mill has a lot of improvements over build tools like Maven or Gradle, but it begs the question: why can’t other build tools improve performance, extensibility, IDE support as well? It turns out that other tools have been working on improving performance, extensibility and IDE support - for decades in the case of Maven or Gradle - but Mill does have secret sauce that makes providing this experience in Mill much easier than providing it in any other build tool.
All build tools are complex, because the requirements of building any size-able real-world project are complex. One big source of build tool complexity is that users need some way to define templated, customizable graph-computations when setting up their build pipelines.
-
Computations as you need to specify what each build step does
-
Graph as the data structure necessary to order and parallelize steps in your build
-
Templated as different modules in a build are often very similar, with similar pipelines
-
Customizable as there are always some module, or group of modules, special in some way
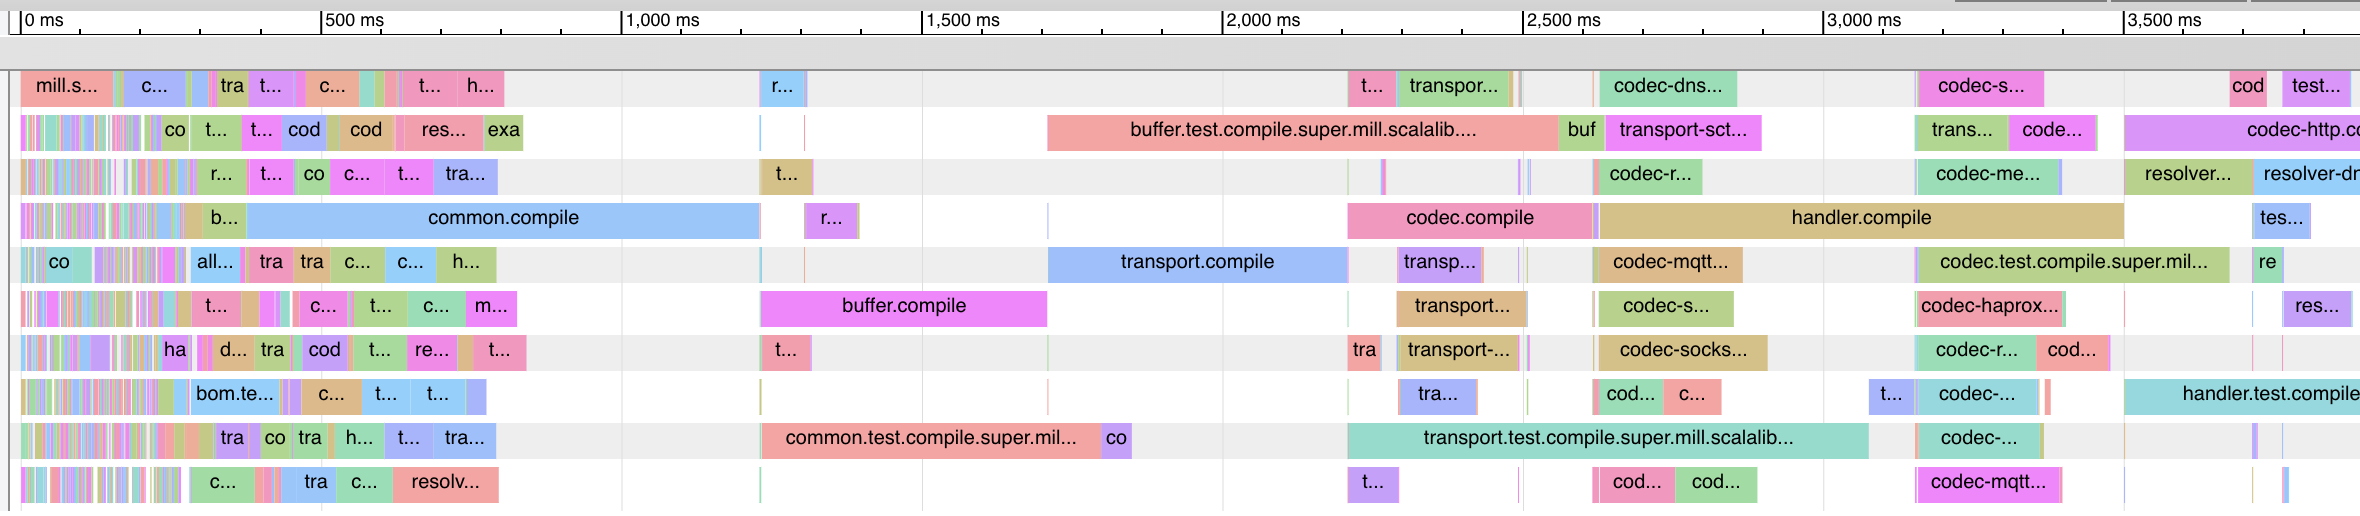
For example, even a simplified three-module Java build pipeline may look like this:
Apart from the various tasks doing different things, we also see multiple modules
with similar task layouts (foo, bar and qux), but with subtle customizations in
each module to wire them up
(e.g. foo.classPath having one upstream task but bar.classPath and qux.classPath
each having two). And this is one of the simplest possible builds: you can imagine that
with compiler and runtime flags, code-generation, dependency-downloading, different language
toolchains, these graphs can get complicated quickly. And any build tool will need some way
for the user to define these graphs and maintain them over time.
Most build tools provide ad-hoc config formats (Maven’s XML) or programmatic builder APIs (e.g. Gradle’s Groovy/Kotlin) to satisfy this need, but these ad-hoc formats inevitably end up being unfamiliar and confusing to users (e.g. the Gradle code discussed above). Many tools try to hide complexity behind plugins, but that doesn’t actually solve it: plugin authors are human too, and can also make mistakes and cause bugs when publishing their plugins. It doesn’t matter whether the bugs are in your own build customization or in the plugins you use if the end result is your build system becomes slow and flaky!
Fundamentally, defining an API for templated, customizable graph-computations is non-trivial, so it is not surprising the APIs and to do so can get complicated. But Mill has one big insight in how it can be done better:
Object-Oriented Build Pipelines
Mill has the same requirement of defining templated, customizable graph-computations, but rather than inventing a bespoke programming, configuration and plugin model to do so, Mill builds upon what everyone already knows: Object-Oriented Programming. It turns out that the object-oriented programming every Java developer learned in school provides all the key building blocks necessary to define templated, customizable graph-computations:
-
Methods provide a way of defining discrete build steps that perform some necessary action in your build
-
The Call Graph between methods provides the build graph, where which method call which other methods defines the incoming edges of that node in the graph
-
Classes provide the templating, where you can define a set of methods calling each other, and instantiate those call graphs more than once in different parts of your build
-
Overrides and Subclasses provide customization: when a particular instance or sub-class needs a different implementation of one-or-more build steps, you can override the respective methods to customize the build call graph to your liking
Thus, when you see a Mill build configured as such, with an object extending a class:
package build
import mill.*, javalib.*

object foo extends JavaModule {
}
This is not some special syntax, but is literally defining an object named foo
inheriting from the class JavaModule. Like any other inheritance, this picks up
the methods and method call graph of JavaModule (slightly simplified below)
And when you add additional tasks by defining methods using def, or override tasks
and call super:
package build
import mill.*, javalib.*

object foo extends JavaModule {
  /** Total number of lines in module source files */
  def lineCount = Task {
    allSourceFiles().map(f => os.read.lines(f.path).size).sum
  }

  /** Generate resources using lineCount of sources */
  override def resources = Task {
    os.write(Task.dest / "line-count.txt", "" + lineCount())
    super.resources() ++ Seq(PathRef(Task.dest))
  }
}
You as a Java programmer already know how these changes affect the build graph, by splicing
in the new method foo.lineCount, replacing foo.resources with a new method body, and
calling foo.super.resources:
If you want to re-use your build pipeline customizations, it as simple as turning the
object foo into a class MyJavaModule (called a trait MyJavaModule in Mill’s syntax), so it
can be inherited by object foo and object bar to share the configuration:
package build
import mill.*, javalib.*

object foo extends MyJavaModule
object bar extends MyJavaModule

trait MyJavaModule extends JavaModule {
  /** Total number of lines in module source files */
  def lineCount = Task {
    allSourceFiles().map(f => os.read.lines(f.path).size).sum
  }

  /** Generate resources using lineCount of sources */
  override def resources = Task {
    os.write(Task.dest / "line-count.txt", "" + lineCount())
    super.resources() ++ Seq(PathRef(Task.dest))
  }
}If you want to further customize either of those modules, you can override
one or more of the inherited methods. And if you want to publish your customizations
for others to use in their own projects,
you can publish
MyJavaModule to Maven Central for others to
import into their build.
Mill’s usage of methods, classes, and overrides is also what powers the IDE support
discussed earlier on this page. IDEs like IntelliJ or VSCode are uniquely adept at
working with JVM codebases full of methods and classes, and so
they can help you navigate and understand your Mill build pipelines just as easily
as any application codebase. And the simplicity of this extension model is what
allows Mill developers to avoid making mistakes aroun caching or parallelism when setting
up their builds or publishing plugins, which ultimately is what gives Mill builds great
performance without ever needing to clean.
Conclusion
Build systems have traditionally been mysterious black boxes that only experts could work with: slow for unknown reasons, with cargo-culted configuration and usage commands, and challenging for normal application developers to contribute improvements to. The things that a build tool needs to do - templated, customizable graph-computations - are inherently complex, and so it is not a surprise that this complexity bleeds through to the user experience.
Mill does not make the complexity in your build pipelines go away, or hide it behind hard-coded helpers or plugins. Instead, Mill lets you manage that complexity using the same object-oriented programming techniques you are already familiar with. With Mill, you can navigate, maintain, and extend your build pipelines in exactly the same way you already navigate, maintain, and extend your JVM application code. And just as object-oriented Java, Scala or Kotlin is performance well-understood by developers or IDEs, object-oriented Mill build code is similarly able to give you the performance, ease of use, and excellent IDE support that the JVM platform is known for.
The rest of this doc-site contains more Mill build tool comparisons (with Maven, Gradle, sbt), with getting started instructions for using Mill with Java, with Scala, or with Kotlin, and detailed documentation for how Mill works. Please try it out and let us know in the discussions forum how it goes!
inputs.files is depending on src/main, when it only really needs src/main/java. That means that changes to src/main/resources or src/main/templates will cause the task redundantly re-compute, making your build slower than necessary. If the bug was the other way - rather than depending on too large a folder instead depending on too small a folder - it would instead cause flakiness where generateLineCount would sometimes not run when it needs to.